Vinyl tile flooring has rapidly become a leading choice for homeowners and interior designers alike, thanks to its remarkable versatility and durability. In this comprehensive guide, we will delve into the world of vinyl tile flooring, exploring its advantages, installation process, maintenance tips, and debunking common myths. Whether you’re planning a DIY project or considering professional installation, this article aims to be your go-to resource for understanding and appreciating the benefits of vinyl tile flooring.
Introduction
Definition of Vinyl Tile Flooring
Vinyl tile flooring, a synthetic flooring material, mimics the look of natural materials like wood or stone. It consists of individual tiles that can be easily installed, providing a cost-effective and aesthetically pleasing flooring solution.
Popularity and Versatility
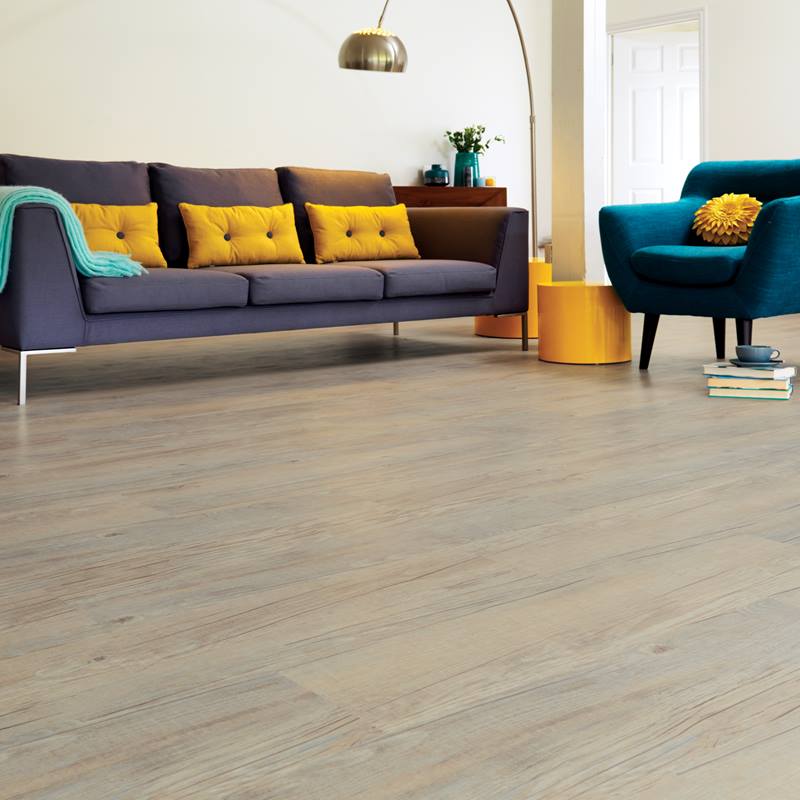
The popularity of vinyl tile flooring can be attributed to its versatility. It is suitable for various spaces, including kitchens, bathrooms, and living areas. The vast array of designs and patterns available allows homeowners to achieve the desired aesthetic without compromising on durability.
Advantages of Vinyl Tile Flooring
Durability and Longevity
Vinyl tile flooring is known for its durability, making it a suitable choice for high-traffic areas. It can withstand the wear and tear of daily use, and with proper maintenance, it boasts an impressive lifespan.
Easy Installation and Maintenance
One of the standout advantages of vinyl tile flooring is its ease of installation. Whether you opt for DIY installation or professional assistance, the process is relatively straightforward. Additionally, maintenance is hassle-free, requiring simple cleaning routines to keep the flooring looking pristine.
Wide Range of Designs
Vinyl tile flooring offers an extensive range of designs, allowing homeowners to achieve the desired look for their space. From realistic wood textures to elegant stone patterns, the design options are virtually limitless.
Types of Vinyl Tile Flooring
Luxury Vinyl Tiles (LVT)
LVT is a premium vinyl flooring option that replicates the look and feel of natural materials with exceptional realism. It often comes with advanced features such as enhanced durability and realistic textures.
Vinyl Composite Tiles (VCT)
VCT is a more traditional vinyl tile flooring option, known for its affordability and durability. It is commonly used in commercial settings but can also be a practical choice for residential spaces.
Considerations Before Choosing Vinyl Tile Flooring
Subfloor Preparation for Vinyl Tile Flooring
The often-overlooked step of subfloor preparation plays a pivotal role in determining the success of your vinyl tile flooring installation. It serves as the foundation upon which your entire flooring structure rests, impacting the aesthetics, durability, and longevity of the final result. Let’s delve into why proper subfloor preparation is not just a preliminary task but a critical component in ensuring a flawless and enduring vinyl tile floor.
Importance of a Clean Subfloor
Before laying down a single vinyl tile, the subfloor must be meticulously cleaned. Any debris, dust, or irregularities on the subfloor’s surface can compromise the adhesive’s effectiveness and, consequently, the overall integrity of the installation. Sweeping away dust and removing any lingering particles are essential steps in creating a clean canvas for the vinyl tiles.
Achieving Level Surfaces
A level subfloor is fundamental for preventing unevenness in the vinyl tile flooring. Irregularities in the subfloor can lead to bumps or depressions, resulting in an unsightly and uncomfortable floor. Levelling compounds or fillers may be employed to address any uneven spots, ensuring a flat and consistent surface that sets the stage for a flawless vinyl tile installation.
The Crucial Element of Dryness
Ensuring a dry subfloor is equally crucial. Moisture can adversely affect the adhesive used to secure vinyl tiles, leading to issues such as warping or disintegration over time. Therefore, it is imperative to verify the subfloor’s dryness, especially in areas prone to dampness, such as basements or bathrooms. Moisture barriers may be applied if needed to safeguard the vinyl tiles from potential damage caused by underlying damp conditions.
Subfloor Material Considerations
Different subfloor materials require distinct preparations. For wooden subfloors, it’s essential to check for any signs of rot or damage, replacing compromised sections to guarantee stability. Concrete subfloors demand extra care to address issues like cracks or unevenness, often necessitating the application of a self-leveling underlayment.
Adhering to Manufacturer Recommendations
Each vinyl tile manufacturer may have specific recommendations regarding subfloor preparation. Adhering to these guidelines is vital to ensure warranty compliance and optimal performance of the vinyl tiles. Manufacturers often provide detailed instructions on acceptable subfloor conditions and necessary preparations, including the type of adhesives to be used.
Professional Assistance for Complex Cases
In cases where subfloor issues are complex or challenging to resolve independently, seeking professional assistance is a wise choice. Experienced flooring professionals possess the expertise to assess and address intricate subfloor conditions, guaranteeing a solid foundation for the vinyl tile installation. Their insights can prove invaluable in achieving a seamless and enduring flooring result.
The Long-Term Impact on Flooring Performance
The efforts invested in subfloor preparation directly correlate with the long-term performance of vinyl tile flooring. A well-prepared subfloor not only enhances the aesthetic appeal of the flooring but also contributes to its stability, reducing the likelihood of issues such as shifting, cracking, or premature wear.
Budget Considerations
Vinyl tile flooring offers a cost-effective solution compared to natural materials like hardwood or stone. Considering your budget constraints while exploring the diverse options ensures a practical and stylish flooring choice.
Environmental Impact
For environmentally conscious consumers, it’s essential to explore eco-friendly vinyl tile options. Some manufacturers offer sustainable choices that reduce the environmental impact without compromising on quality.
Vinyl Tile vs. Other Flooring Options
Vinyl Tile vs. Ceramic Tiles: A Duel of Durability
Durability
Vinyl tile and ceramic tiles both offer commendable durability, but they achieve it in different ways. Ceramic tiles are renowned for their robustness and resistance to scratches, making them suitable for high-traffic areas. On the other hand, vinyl tile, while durable, is more forgiving underfoot due to its softer composition, providing a more comfortable surface.
Maintenance
Maintenance is a crucial aspect of any flooring choice. Ceramic tiles, with their hard, glazed surface, are resistant to stains and water, making them easy to clean. Vinyl tiles, with their moisture-resistant properties, also offer easy maintenance but may require occasional resealing for enhanced protection.
Design Options
Both vinyl and ceramic tiles provide a diverse array of design options. Ceramic tiles often emulate natural materials like stone or marble, offering a classic aesthetic. In contrast, vinyl tiles are celebrated for their versatility, mimicking various materials, including wood and stone, and offering an extensive range of patterns and colours.
Vinyl Tile vs. Hardwood Flooring
Aesthetics
Hardwood flooring exudes a timeless and luxurious appeal, adding warmth and character to any space. Vinyl tile, however, has come a long way in replicating the natural look of wood, offering a more budget-friendly alternative without sacrificing aesthetics. The choice boils down to personal preference and the desired aesthetic for your home.
Practicality
Vinyl tile takes the lead in practicality, especially in areas prone to moisture or heavy foot traffic. It is water-resistant, resilient against scratches, and easy to maintain. Hardwood, while undeniably beautiful, requires more caution in moisture-prone areas and demands careful maintenance to preserve its appearance.
Maintenance
Hardwood flooring demands regular upkeep, including refinishing and sealing to maintain its appearance and protect against wear. Vinyl tile, being inherently low-maintenance, offers a hassle-free solution that retains its aesthetic appeal with simple cleaning routines.
Vinyl Tile Installation Process
DIY Installation Tips
If you’re inclined towards a do-it-yourself approach, we will provide step-by-step tips for a successful vinyl tile flooring installation. From preparing the subfloor to ensuring accurate measurements, this section aims to be your DIY guide.
- Subfloor Preparation: The Foundation of Success
- Clean and Clear:
Begin by thoroughly cleaning the subfloor. Remove any debris, dust, or irregularities that might interfere with the adherence of the vinyl tiles.
- Level the Playing Field:
Ensure a level subfloor by addressing any uneven spots. Levelling compounds or fillers can be applied to create a flat surface, essential for achieving a professional-looking finish.
- Check for Moisture:
Verify the dryness of the subfloor, especially in areas prone to dampness. Moisture can compromise the adhesive, leading to issues down the line. Apply moisture barriers if necessary.
- Gather Your Tools and Materials: Be Prepared
- Essential Tools:
Gather the necessary tools, including a utility knife, measuring tape, straight edge, notched trowel, and a rubber mallet. Having the right tools on hand ensures precision throughout the installation process.
- Vinyl Tile Adhesive:
Choose a high-quality vinyl tile adhesive suitable for your specific flooring type. Follow the manufacturer’s guidelines regarding adhesive application and drying times.
- Vinyl Tiles and Spacers:
Purchase vinyl tiles that suit your aesthetic preferences and the intended space. Additionally, acquire spacers to maintain consistent gaps between tiles during installation.
- Plan Your Layout: Strategy Matters
- Dry Run:
Before applying adhesive, conduct a dry run by laying out the vinyl tiles without adhering them to the subfloor. This allows you to assess the layout, make adjustments, and ensure a balanced appearance.
- Start from the Centre:
Begin the installation from the centre of the room, working outward. This helps achieve a symmetrical look and minimises the need for cutting tiles at the edges.
- Cutting Vinyl Tiles: Precision Matters
- Accurate Measurements:
Measure and mark tiles accurately before cutting. A straightedge and a sharp utility knife ensure clean and precise cuts, particularly for tiles at the edges of the room.
- Mind the Pattern:
Pay attention to the pattern and design of the vinyl tiles, especially if they have specific directional features. Aligning patterns correctly enhances the overall visual appeal.
- Adhesive Application: The Glue Holding It Together
- Follow Manufacturer Guidelines:
Adhere strictly to the guidelines provided by the vinyl tile adhesive manufacturer. Apply the adhesive evenly using a notched trowel, ensuring a sufficient layer for proper tile adherence.
- Work in Sections:
Divide the floor into manageable sections to ensure that the adhesive doesn’t dry before laying the tiles. Work methodically, placing tiles firmly and using a rubber mallet if needed to set them in place.
- Finishing Touches: Bringing It All Together
- Use Spacers:
Insert spacers between tiles to maintain consistent gaps. This not only enhances the visual appeal but also accommodates potential expansion.
- Wait for Adhesive to Cure:
Allow the adhesive to cure completely before moving furniture back into the space or engaging in regular foot traffic. Follow the recommended drying times provided by the adhesive manufacturer.
- Post-Installation Cleanup: The Final Step
- Remove Excess Adhesive:
Once the adhesive has cured, remove any excess adhesive from the tiles and clean the surface thoroughly. This ensures a polished and professional appearance.
- Inspect and Enjoy:
Inspect the completed installation, checking for any loose tiles or irregularities. Once satisfied, step back and enjoy the fruits of your DIY labour.
Professional Installation Benefits
For those seeking professional assistance, we will delve into the benefits of hiring experts for vinyl tile flooring installation. Precision, efficiency, and a flawless finish are some of the advantages explored in this section.
Maintaining Vinyl Tile Flooring
Cleaning and Care Tips
Vinyl tile flooring is celebrated for its low-maintenance characteristics, offering a practical and visually appealing solution for various spaces. To ensure your vinyl tiles maintain their beauty and longevity, it’s crucial to employ the right cleaning methods. In this section, we will provide practical tips for routine cleaning, empowering you with the knowledge needed to preserve the pristine appearance of your vinyl tiles.
1. Regular Sweeping or Vacuuming: The Foundation of Cleanliness
a. Dust and Debris Removal:
Begin by sweeping or vacuuming the vinyl tile floor regularly to eliminate loose dirt, dust, and debris. This prevents abrasive particles from scratching the surface of the tiles over time.
b. Soft Bristle Brushes:
When using a broom or vacuum, opt for soft bristle brushes or vacuum attachments suitable for hard floors to avoid any potential damage to the vinyl tile surface.
2. Damp Mopping: Gentle and Effective
a. Use a Soft Mop:
For deeper cleaning, damp mop the vinyl tile floor using a soft mop. Microfiber mops are particularly effective, providing gentle yet thorough cleaning.
b. Mild Cleaning Solutions:
Mix a solution of mild dish soap or a specialised vinyl floor cleaner with warm water. Avoid harsh chemicals or abrasive cleaners that can damage the protective layer of the vinyl tiles.
c. Wring Out Excess Moisture:
Ensure the mop is well-wrung before applying it to the floor. Excess moisture can seep into seams or edges, potentially causing damage over time.
3. Addressing Spills Promptly: Prevention is Key
a. Immediate Clean-Up:
Attend to spills promptly to prevent staining. Use a soft cloth or paper towel to blot and absorb the liquid, followed by a gentle cleaning with the damp mop.
b. Avoid Standing Water:
Vinyl tile flooring is moisture-resistant, but standing water should still be avoided. Wipe up any spills promptly to prevent water from seeping into seams or edges.
4. Steering Clear of Harsh Chemicals: Protecting the Finish
a. Avoid Abrasive Cleaners:
Refrain from using abrasive cleaners, wax-based products, or harsh chemicals on vinyl tile flooring. These can damage the protective finish and compromise the overall appearance.
b. Vinyl-Safe Cleaners:
Choose cleaning products specifically designed for vinyl floors. These are formulated to clean effectively without causing harm to the vinyl surface.
5. Regular Inspection: Identifying Issues Early
a. Check for Damage:
Periodically inspect the vinyl tiles for any signs of damage, such as scratches, gouges, or worn areas. Addressing issues promptly can prevent further deterioration.
b. Addressing Wear and Tear:
In high-traffic areas, consider using rugs or mats to reduce wear on specific spots. This proactive approach can extend the lifespan of your vinyl tile flooring.
6. Avoiding Rubber or Sharp Objects: Preventing Damage
a. Rubber Backed Mats:
Use mats with non-rubber backing at entrances to prevent tracking in dirt. Rubber-backed mats can, over time, cause discolouration or damage to the vinyl surface.
b. Cushioning Furniture:
When moving furniture, use caution and consider placing protective pads underneath to prevent scratching or gouging the vinyl tiles.
7. Periodic Deep Cleaning: Restoring Shine
a. Occasional Deep Cleaning:
Schedule periodic deep cleaning sessions using a vinyl floor cleaner or a solution of white vinegar and water. Follow the manufacturer’s recommendations for deep cleaning intervals.
b. Avoid Steam Cleaners:
Steer clear of steam cleaners as the high temperature and moisture can damage the adhesive holding the vinyl tiles in place.
By incorporating these cleaning and care tips into your routine, you can ensure that your vinyl tile flooring remains not only low-maintenance but also retains its original lustre and appeal. Taking a proactive and gentle approach to cleaning will contribute to the long-lasting beauty of your vinyl tiles, making them a resilient and aesthetically pleasing choice for your home.
Expert Recommendations
Insights from Flooring Professionals
Flooring professionals share their expertise on vinyl tile flooring. From selecting the right type for your space to maintenance tips, their insights will guide you in making informed decisions for your flooring needs.
Tips for Maximising Vinyl Tile Flooring Benefits
Experts provide tips on how to make the most of your vinyl tile flooring. From choosing the right design for your space to extending the lifespan of your flooring, these recommendations are tailored for vinyl tile users.
Conclusion
In summary, vinyl tile flooring stands out as a practical and stylish choice for modern homeowners. Its durability, ease of installation, and wide range of designs make it a versatile solution for various spaces. Whether you opt for luxury vinyl tiles or traditional vinyl composite tiles, the benefits of this flooring option are undeniable.
Investing in vinyl tile flooring not only transforms the aesthetics of your space but also offers a long-lasting and low-maintenance solution. Whether you’re a DIY enthusiast or prefer professional assistance, vinyl tile flooring provides a cost-effective and visually appealing alternative to traditional flooring materials.
To explore the possibilities of vinyl tile flooring for your home, visit our website at www.thefittedcarpetco.co.uk or call us at 01580 753483. Discover how vinyl tile flooring can elevate your living spaces, providing a perfect balance of durability, style, and comfort.
FAQs – Your Vinyl Tile Flooring Queries Answered!
Q: Is vinyl tile flooring suitable for high-traffic areas like kitchens and hallways?
A: Yes, vinyl tile flooring is highly durable and a practical choice for high-traffic areas, offering both style and resilience.
Q: Can I install vinyl tile flooring over an existing floor?
A: In many cases, yes. Proper preparation of the existing floor is crucial for a successful vinyl tile installation.
Q: How do I choose between luxury vinyl tiles (LVT) and vinyl composite tiles (VCT)?
A: The choice depends on factors like budget, desired aesthetics, and the level of durability you require. LVT offers premium features, while VCT is a more budget-friendly option.
Q: What are the maintenance requirements for vinyl tile flooring?
A: Vinyl tile flooring is low-maintenance. Regular sweeping or vacuuming, along with occasional damp mopping, is usually sufficient to keep it looking pristine.
Q: Are there environmentally friendly options for vinyl tile flooring?
A: Yes, some manufacturers offer sustainable and eco-friendly vinyl tile options, ensuring that you can make an environmentally conscious choice for your flooring.