How to Stop creaking floorboards under carpet is one of those household questions that tends to arrive without an appointment. One minute the carpet is behaving itself, the next it is wearing a fresh mark, smell, dent, or mystery patch like an unwanted badge. The good news is that most carpet problems can be improved, and many can be solved completely, with a calm approach, the right tools, and a little patience.
Installation jobs are less about brute force and more about accurate measuring, careful cutting, and tidy sequencing. A carpet can look luxurious or lumpy depending on the planning that happens before it is even rolled out. In the steps below, you will find a plain-English process that helps you avoid wasted material, loose edges, visible joins, and the kind of fitting errors that creak at you for months.
Step-by-step method
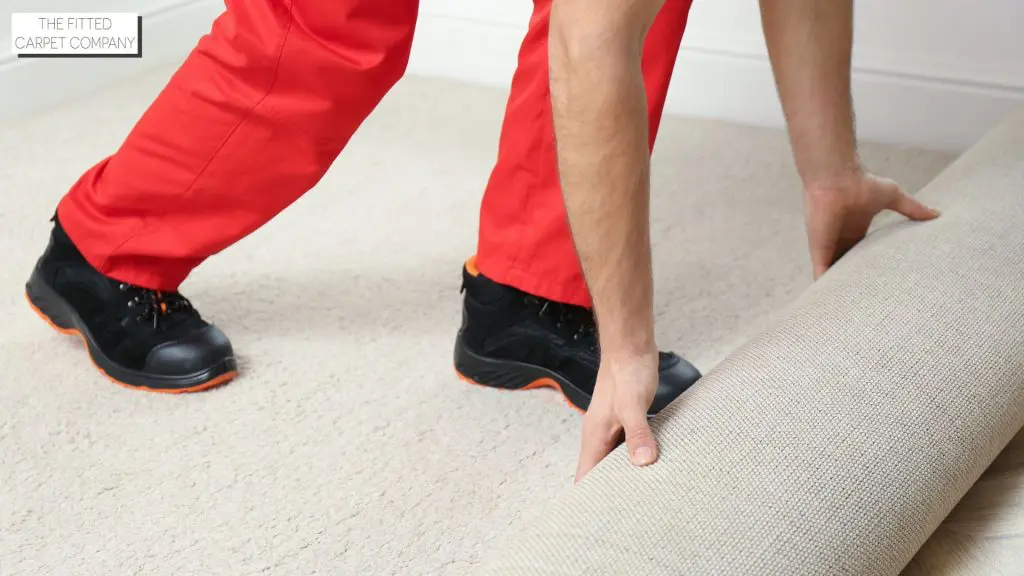
Measure the room carefully at the widest and longest points, allowing for alcoves, doorways, and a small cutting margin.
Check the subfloor before fitting. It should be clean, dry, sound, and level. Deal with squeaks, damp, and protruding fixings first.
Install grippers and underlay in the correct order for the space. Good preparation does more for the final feel than most people realise.
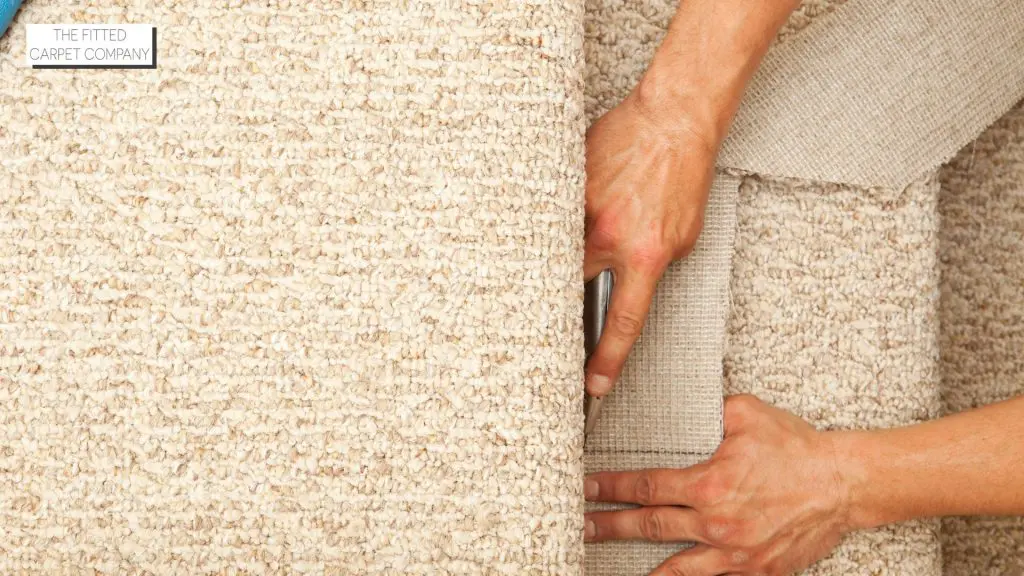
Plan the pile direction and joins before cutting. Poor planning can make seams visible or change the way light hits the carpet.
Trim gradually rather than taking too much in one cut. A careful shave beats an accidental haircut every time.
Stretch and secure the carpet properly so it sits flat, tight, and smooth without ripples or loose edges.
Before you start
Check tools, carpet direction, doorway heights, skirting condition, and the state of the subfloor before making the first cut. Many fitting headaches begin earlier than people think. A dry, clean, level base and accurate measurements give the whole job a calmer rhythm and reduce waste.
Mistakes to avoid
Measuring only the visible floor and forgetting recesses, thresholds, or turning points on stairs.
Cutting too aggressively instead of trimming gradually.
Skipping subfloor preparation and hoping the carpet will hide every sin below it.
Underestimating how much a poor stretch or badly planned join affects the finished look.
When to call a professional
Bring in a professional if the carpet is expensive, the affected area is large, the stain or smell has soaked into the underlay, there is repeated pest activity, or DIY attempts have already changed the texture or colour. Professional cleaners, fitters, and pest specialists have access to stronger equipment, better diagnostics, and the kind of experience that saves a lot of second-guessing.
Frequently asked questions
How to Stop creaking floorboards under carpet
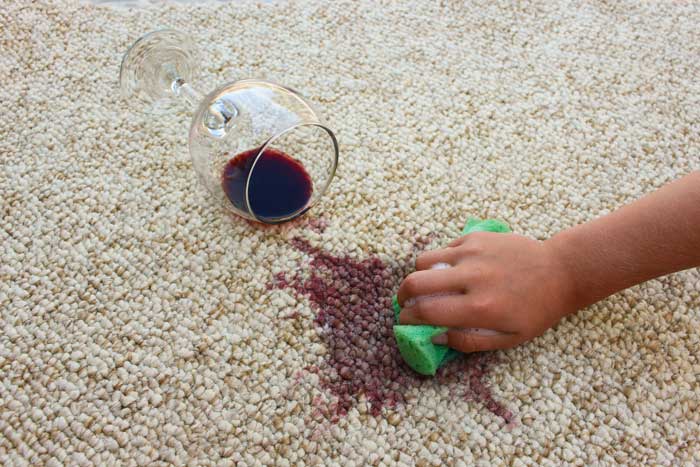
Yes, in many cases it can be improved or solved completely, especially when you act quickly, use the correct method for the carpet type, and avoid over-wetting or over-scrubbing.
What should I test before treating the full area?
Test the cleaning product or method on a hidden section first. Check for colour loss, texture change, or damage to the backing.
How long should I wait before deciding whether it worked?
Wait until the carpet is fully dry. Many marks look lighter or darker while damp, and some residue only becomes obvious after drying.
Tools that usually help
For most carpet jobs, a small kit goes a long way: white microfibre cloths, paper towels, a spoon or blunt scraper, a vacuum with a clean head, lukewarm water, a plain spray bottle, and a carpet-safe detergent or specialist stain remover suited to the issue. A fan is useful for drying, and in odour cases an enzyme-based product can be more effective than a heavily perfumed cleaner because it targets the residue rather than trying to merely out-sing it.
How to protect the carpet afterwards
Once the area is clean and dry, avoid heavy traffic for a while and vacuum the surrounding space when everything has settled. Use entrance mats, rotate rugs, trim pet claws where appropriate, and deal with spills as soon as possible. Prevention is rarely glamorous, but it is the quiet hero in the cape. Good habits reduce repeat staining, odours, tracking, and wear, which means the carpet looks better and lasts longer.
Final thoughts
How to Stop creaking floorboards under carpet does not need panic, only a sensible plan. Start gently, work in stages, keep moisture under control, and dry the area properly before judging the result. If the issue is stubborn, widespread, or tied to the subfloor, underlay, or an active pest problem, professional help is often the fastest route to a genuinely clean and lasting finish.
A final practical tip: keep white cloths, paper towels, a blunt scraper, and a small spray bottle ready in a cupboard. Most carpet emergencies are easier to handle when you do not spend the first ten minutes rummaging for supplies while the stain settles in like an unwanted tenant.
How Much Does Carpet Fitting Cost is one of those household questions that tends to arrive without an appointment. One minute the carpet is behaving itself, the next it is wearing a fresh mark, smell, dent, or mystery patch like an unwanted badge. The good news is that most carpet problems can be improved, and many can be solved completely, with a calm approach, the right tools, and a little patience.
Installation jobs are less about brute force and more about accurate measuring, careful cutting, and tidy sequencing. A carpet can look luxurious or lumpy depending on the planning that happens before it is even rolled out. In the steps below, you will find a plain-English process that helps you avoid wasted material, loose edges, visible joins, and the kind of fitting errors that creak at you for months.
Step-by-step method
Measure the room carefully at the widest and longest points, allowing for alcoves, doorways, and a small cutting margin.
Check the subfloor before fitting. It should be clean, dry, sound, and level. Deal with squeaks, damp, and protruding fixings first.
Install grippers and underlay in the correct order for the space. Good preparation does more for the final feel than most people realise.
Plan the pile direction and joins before cutting. Poor planning can make seams visible or change the way light hits the carpet.
Trim gradually rather than taking too much in one cut. A careful shave beats an accidental haircut every time.
Stretch and secure the carpet properly so it sits flat, tight, and smooth without ripples or loose edges.
Before you start
Check tools, carpet direction, doorway heights, skirting condition, and the state of the subfloor before making the first cut. Many fitting headaches begin earlier than people think. A dry, clean, level base and accurate measurements give the whole job a calmer rhythm and reduce waste.
Mistakes to avoid
Measuring only the visible floor and forgetting recesses, thresholds, or turning points on stairs.
Cutting too aggressively instead of trimming gradually.
Skipping subfloor preparation and hoping the carpet will hide every sin below it.
Underestimating how much a poor stretch or badly planned join affects the finished look.
When to call a professional
Bring in a professional if the carpet is expensive, the affected area is large, the stain or smell has soaked into the underlay, there is repeated pest activity, or DIY attempts have already changed the texture or colour. Professional cleaners, fitters, and pest specialists have access to stronger equipment, better diagnostics, and the kind of experience that saves a lot of second-guessing.
Frequently asked questions
How Much Does Carpet Fitting Cost
Yes, in many cases it can be improved or solved completely, especially when you act quickly, use the correct method for the carpet type, and avoid over-wetting or over-scrubbing.
What should I test before treating the full area?
Test the cleaning product or method on a hidden section first. Check for colour loss, texture change, or damage to the backing.
How long should I wait before deciding whether it worked?
Wait until the carpet is fully dry. Many marks look lighter or darker while damp, and some residue only becomes obvious after drying.
Tools that usually help
For most carpet jobs, a small kit goes a long way: white microfibre cloths, paper towels, a spoon or blunt scraper, a vacuum with a clean head, lukewarm water, a plain spray bottle, and a carpet-safe detergent or specialist stain remover suited to the issue. A fan is useful for drying, and in odour cases an enzyme-based product can be more effective than a heavily perfumed cleaner because it targets the residue rather than trying to merely out-sing it.
How to protect the carpet afterwards
Once the area is clean and dry, avoid heavy traffic for a while and vacuum the surrounding space when everything has settled. Use entrance mats, rotate rugs, trim pet claws where appropriate, and deal with spills as soon as possible. Prevention is rarely glamorous, but it is the quiet hero in the cape. Good habits reduce repeat staining, odours, tracking, and wear, which means the carpet looks better and lasts longer.
Final thoughts
How Much Does Carpet Fitting Cost does not need panic, only a sensible plan. Start gently, work in stages, keep moisture under control, and dry the area properly before judging the result. If the issue is stubborn, widespread, or tied to the subfloor, underlay, or an active pest problem, professional help is often the fastest route to a genuinely clean and lasting finish.
A final practical tip: keep white cloths, paper towels, a blunt scraper, and a small spray bottle ready in a cupboard. Most carpet emergencies are easier to handle when you do not spend the first ten minutes rummaging for supplies while the stain settles in like an unwanted tenant.
How Much To Carpet Stairs is one of those household questions that tends to arrive without an appointment. One minute the carpet is behaving itself, the next it is wearing a fresh mark, smell, dent, or mystery patch like an unwanted badge. The good news is that most carpet problems can be improved, and many can be solved completely, with a calm approach, the right tools, and a little patience.
Installation jobs are less about brute force and more about accurate measuring, careful cutting, and tidy sequencing. A carpet can look luxurious or lumpy depending on the planning that happens before it is even rolled out. In the steps below, you will find a plain-English process that helps you avoid wasted material, loose edges, visible joins, and the kind of fitting errors that creak at you for months.
Step-by-step method
Measure the room carefully at the widest and longest points, allowing for alcoves, doorways, and a small cutting margin.
Check the subfloor before fitting. It should be clean, dry, sound, and level. Deal with squeaks, damp, and protruding fixings first.
Install grippers and underlay in the correct order for the space. Good preparation does more for the final feel than most people realise.
Plan the pile direction and joins before cutting. Poor planning can make seams visible or change the way light hits the carpet.
Trim gradually rather than taking too much in one cut. A careful shave beats an accidental haircut every time.
Stretch and secure the carpet properly so it sits flat, tight, and smooth without ripples or loose edges.
Before you start
Check tools, carpet direction, doorway heights, skirting condition, and the state of the subfloor before making the first cut. Many fitting headaches begin earlier than people think. A dry, clean, level base and accurate measurements give the whole job a calmer rhythm and reduce waste.
Mistakes to avoid
Measuring only the visible floor and forgetting recesses, thresholds, or turning points on stairs.
Cutting too aggressively instead of trimming gradually.
Skipping subfloor preparation and hoping the carpet will hide every sin below it.
Underestimating how much a poor stretch or badly planned join affects the finished look.
When to call a professional
Bring in a professional if the carpet is expensive, the affected area is large, the stain or smell has soaked into the underlay, there is repeated pest activity, or DIY attempts have already changed the texture or colour. Professional cleaners, fitters, and pest specialists have access to stronger equipment, better diagnostics, and the kind of experience that saves a lot of second-guessing.
Frequently asked questions
How Much To Carpet Stairs
Yes, in many cases it can be improved or solved completely, especially when you act quickly, use the correct method for the carpet type, and avoid over-wetting or over-scrubbing.
What should I test before treating the full area?
Test the cleaning product or method on a hidden section first. Check for colour loss, texture change, or damage to the backing.
How long should I wait before deciding whether it worked?
Wait until the carpet is fully dry. Many marks look lighter or darker while damp, and some residue only becomes obvious after drying.
Tools that usually help
For most carpet jobs, a small kit goes a long way: white microfibre cloths, paper towels, a spoon or blunt scraper, a vacuum with a clean head, lukewarm water, a plain spray bottle, and a carpet-safe detergent or specialist stain remover suited to the issue. A fan is useful for drying, and in odour cases an enzyme-based product can be more effective than a heavily perfumed cleaner because it targets the residue rather than trying to merely out-sing it.
How to protect the carpet afterwards
Once the area is clean and dry, avoid heavy traffic for a while and vacuum the surrounding space when everything has settled. Use entrance mats, rotate rugs, trim pet claws where appropriate, and deal with spills as soon as possible. Prevention is rarely glamorous, but it is the quiet hero in the cape. Good habits reduce repeat staining, odours, tracking, and wear, which means the carpet looks better and lasts longer.
Final thoughts
How Much To Carpet Stairs does not need panic, only a sensible plan. Start gently, work in stages, keep moisture under control, and dry the area properly before judging the result. If the issue is stubborn, widespread, or tied to the subfloor, underlay, or an active pest problem, professional help is often the fastest route to a genuinely clean and lasting finish.
A final practical tip: keep white cloths, paper towels, a blunt scraper, and a small spray bottle ready in a cupboard. Most carpet emergencies are easier to handle when you do not spend the first ten minutes rummaging for supplies while the stain settles in like an unwanted tenant.
How Long Does It Take To Fit A Carpet is one of those household questions that tends to arrive without an appointment. One minute the carpet is behaving itself, the next it is wearing a fresh mark, smell, dent, or mystery patch like an unwanted badge. The good news is that most carpet problems can be improved, and many can be solved completely, with a calm approach, the right tools, and a little patience.
Installation jobs are less about brute force and more about accurate measuring, careful cutting, and tidy sequencing. A carpet can look luxurious or lumpy depending on the planning that happens before it is even rolled out. In the steps below, you will find a plain-English process that helps you avoid wasted material, loose edges, visible joins, and the kind of fitting errors that creak at you for months.
Step-by-step method
Measure the room carefully at the widest and longest points, allowing for alcoves, doorways, and a small cutting margin.
Check the subfloor before fitting. It should be clean, dry, sound, and level. Deal with squeaks, damp, and protruding fixings first.
Install grippers and underlay in the correct order for the space. Good preparation does more for the final feel than most people realise.
Plan the pile direction and joins before cutting. Poor planning can make seams visible or change the way light hits the carpet.
Trim gradually rather than taking too much in one cut. A careful shave beats an accidental haircut every time.
Stretch and secure the carpet properly so it sits flat, tight, and smooth without ripples or loose edges.
Before you start
Check tools, carpet direction, doorway heights, skirting condition, and the state of the subfloor before making the first cut. Many fitting headaches begin earlier than people think. A dry, clean, level base and accurate measurements give the whole job a calmer rhythm and reduce waste.
Mistakes to avoid
Measuring only the visible floor and forgetting recesses, thresholds, or turning points on stairs.
Cutting too aggressively instead of trimming gradually.
Skipping subfloor preparation and hoping the carpet will hide every sin below it.
Underestimating how much a poor stretch or badly planned join affects the finished look.
When to call a professional
Bring in a professional if the carpet is expensive, the affected area is large, the stain or smell has soaked into the underlay, there is repeated pest activity, or DIY attempts have already changed the texture or colour. Professional cleaners, fitters, and pest specialists have access to stronger equipment, better diagnostics, and the kind of experience that saves a lot of second-guessing.
Frequently asked questions
How Long Does It Take To Fit A Carpet
Yes, in many cases it can be improved or solved completely, especially when you act quickly, use the correct method for the carpet type, and avoid over-wetting or over-scrubbing.
What should I test before treating the full area?
Test the cleaning product or method on a hidden section first. Check for colour loss, texture change, or damage to the backing.
How long should I wait before deciding whether it worked?
Wait until the carpet is fully dry. Many marks look lighter or darker while damp, and some residue only becomes obvious after drying.
Tools that usually help
For most carpet jobs, a small kit goes a long way: white microfibre cloths, paper towels, a spoon or blunt scraper, a vacuum with a clean head, lukewarm water, a plain spray bottle, and a carpet-safe detergent or specialist stain remover suited to the issue. A fan is useful for drying, and in odour cases an enzyme-based product can be more effective than a heavily perfumed cleaner because it targets the residue rather than trying to merely out-sing it.
How to protect the carpet afterwards
Once the area is clean and dry, avoid heavy traffic for a while and vacuum the surrounding space when everything has settled. Use entrance mats, rotate rugs, trim pet claws where appropriate, and deal with spills as soon as possible. Prevention is rarely glamorous, but it is the quiet hero in the cape. Good habits reduce repeat staining, odours, tracking, and wear, which means the carpet looks better and lasts longer.
Final thoughts
How Long Does It Take To Fit A Carpet does not need panic, only a sensible plan. Start gently, work in stages, keep moisture under control, and dry the area properly before judging the result. If the issue is stubborn, widespread, or tied to the subfloor, underlay, or an active pest problem, professional help is often the fastest route to a genuinely clean and lasting finish.
A final practical tip: keep white cloths, paper towels, a blunt scraper, and a small spray bottle ready in a cupboard. Most carpet emergencies are easier to handle when you do not spend the first ten minutes rummaging for supplies while the stain settles in like an unwanted tenant.
How to Remove carpet is one of those household questions that tends to arrive without an appointment. One minute the carpet is behaving itself, the next it is wearing a fresh mark, smell, dent, or mystery patch like an unwanted badge. The good news is that most carpet problems can be improved, and many can be solved completely, with a calm approach, the right tools, and a little patience.
Installation jobs are less about brute force and more about accurate measuring, careful cutting, and tidy sequencing. A carpet can look luxurious or lumpy depending on the planning that happens before it is even rolled out. In the steps below, you will find a plain-English process that helps you avoid wasted material, loose edges, visible joins, and the kind of fitting errors that creak at you for months.
Step-by-step method
Measure the room carefully at the widest and longest points, allowing for alcoves, doorways, and a small cutting margin.
Check the subfloor before fitting. It should be clean, dry, sound, and level. Deal with squeaks, damp, and protruding fixings first.
Install grippers and underlay in the correct order for the space. Good preparation does more for the final feel than most people realise.
Plan the pile direction and joins before cutting. Poor planning can make seams visible or change the way light hits the carpet.
Trim gradually rather than taking too much in one cut. A careful shave beats an accidental haircut every time.
Stretch and secure the carpet properly so it sits flat, tight, and smooth without ripples or loose edges.
Before you start
Check tools, carpet direction, doorway heights, skirting condition, and the state of the subfloor before making the first cut. Many fitting headaches begin earlier than people think. A dry, clean, level base and accurate measurements give the whole job a calmer rhythm and reduce waste.
Mistakes to avoid
Measuring only the visible floor and forgetting recesses, thresholds, or turning points on stairs.
Cutting too aggressively instead of trimming gradually.
Skipping subfloor preparation and hoping the carpet will hide every sin below it.
Underestimating how much a poor stretch or badly planned join affects the finished look.
When to call a professional
Bring in a professional if the carpet is expensive, the affected area is large, the stain or smell has soaked into the underlay, there is repeated pest activity, or DIY attempts have already changed the texture or colour. Professional cleaners, fitters, and pest specialists have access to stronger equipment, better diagnostics, and the kind of experience that saves a lot of second-guessing.
Frequently asked questions
How to Remove carpet
Yes, in many cases it can be improved or solved completely, especially when you act quickly, use the correct method for the carpet type, and avoid over-wetting or over-scrubbing.
What should I test before treating the full area?
Test the cleaning product or method on a hidden section first. Check for colour loss, texture change, or damage to the backing.
How long should I wait before deciding whether it worked?
Wait until the carpet is fully dry. Many marks look lighter or darker while damp, and some residue only becomes obvious after drying.
Tools that usually help
For most carpet jobs, a small kit goes a long way: white microfibre cloths, paper towels, a spoon or blunt scraper, a vacuum with a clean head, lukewarm water, a plain spray bottle, and a carpet-safe detergent or specialist stain remover suited to the issue. A fan is useful for drying, and in odour cases an enzyme-based product can be more effective than a heavily perfumed cleaner because it targets the residue rather than trying to merely out-sing it.
How to protect the carpet afterwards
Once the area is clean and dry, avoid heavy traffic for a while and vacuum the surrounding space when everything has settled. Use entrance mats, rotate rugs, trim pet claws where appropriate, and deal with spills as soon as possible. Prevention is rarely glamorous, but it is the quiet hero in the cape. Good habits reduce repeat staining, odours, tracking, and wear, which means the carpet looks better and lasts longer.
Final thoughts
How to Remove carpet does not need panic, only a sensible plan. Start gently, work in stages, keep moisture under control, and dry the area properly before judging the result. If the issue is stubborn, widespread, or tied to the subfloor, underlay, or an active pest problem, professional help is often the fastest route to a genuinely clean and lasting finish.
A final practical tip: keep white cloths, paper towels, a blunt scraper, and a small spray bottle ready in a cupboard. Most carpet emergencies are easier to handle when you do not spend the first ten minutes rummaging for supplies while the stain settles in like an unwanted tenant.
How to Remove carpet stains is one of those household questions that tends to arrive without an appointment. One minute the carpet is behaving itself, the next it is wearing a fresh mark, smell, dent, or mystery patch like an unwanted badge. The good news is that most carpet problems can be improved, and many can be solved completely, with a calm approach, the right tools, and a little patience.
Installation jobs are less about brute force and more about accurate measuring, careful cutting, and tidy sequencing. A carpet can look luxurious or lumpy depending on the planning that happens before it is even rolled out. In the steps below, you will find a plain-English process that helps you avoid wasted material, loose edges, visible joins, and the kind of fitting errors that creak at you for months.
Step-by-step method
Measure the room carefully at the widest and longest points, allowing for alcoves, doorways, and a small cutting margin.
Check the subfloor before fitting. It should be clean, dry, sound, and level. Deal with squeaks, damp, and protruding fixings first.
Install grippers and underlay in the correct order for the space. Good preparation does more for the final feel than most people realise.
Plan the pile direction and joins before cutting. Poor planning can make seams visible or change the way light hits the carpet.
Trim gradually rather than taking too much in one cut. A careful shave beats an accidental haircut every time.
Stretch and secure the carpet properly so it sits flat, tight, and smooth without ripples or loose edges.
Before you start
Check tools, carpet direction, doorway heights, skirting condition, and the state of the subfloor before making the first cut. Many fitting headaches begin earlier than people think. A dry, clean, level base and accurate measurements give the whole job a calmer rhythm and reduce waste.
Mistakes to avoid
Measuring only the visible floor and forgetting recesses, thresholds, or turning points on stairs.
Cutting too aggressively instead of trimming gradually.
Skipping subfloor preparation and hoping the carpet will hide every sin below it.
Underestimating how much a poor stretch or badly planned join affects the finished look.
When to call a professional
Bring in a professional if the carpet is expensive, the affected area is large, the stain or smell has soaked into the underlay, there is repeated pest activity, or DIY attempts have already changed the texture or colour. Professional cleaners, fitters, and pest specialists have access to stronger equipment, better diagnostics, and the kind of experience that saves a lot of second-guessing.
Frequently asked questions
How to Remove carpet stains
Yes, in many cases it can be improved or solved completely, especially when you act quickly, use the correct method for the carpet type, and avoid over-wetting or over-scrubbing.
What should I test before treating the full area?
Test the cleaning product or method on a hidden section first. Check for colour loss, texture change, or damage to the backing.
How long should I wait before deciding whether it worked?
Wait until the carpet is fully dry. Many marks look lighter or darker while damp, and some residue only becomes obvious after drying.
Tools that usually help
For most carpet jobs, a small kit goes a long way: white microfibre cloths, paper towels, a spoon or blunt scraper, a vacuum with a clean head, lukewarm water, a plain spray bottle, and a carpet-safe detergent or specialist stain remover suited to the issue. A fan is useful for drying, and in odour cases an enzyme-based product can be more effective than a heavily perfumed cleaner because it targets the residue rather than trying to merely out-sing it.
How to protect the carpet afterwards
Once the area is clean and dry, avoid heavy traffic for a while and vacuum the surrounding space when everything has settled. Use entrance mats, rotate rugs, trim pet claws where appropriate, and deal with spills as soon as possible. Prevention is rarely glamorous, but it is the quiet hero in the cape. Good habits reduce repeat staining, odours, tracking, and wear, which means the carpet looks better and lasts longer.
Final thoughts
How to Remove carpet stains does not need panic, only a sensible plan. Start gently, work in stages, keep moisture under control, and dry the area properly before judging the result. If the issue is stubborn, widespread, or tied to the subfloor, underlay, or an active pest problem, professional help is often the fastest route to a genuinely clean and lasting finish.
A final practical tip: keep white cloths, paper towels, a blunt scraper, and a small spray bottle ready in a cupboard. Most carpet emergencies are easier to handle when you do not spend the first ten minutes rummaging for supplies while the stain settles in like an unwanted tenant.
How to Measure carpet for stairs is one of those household questions that tends to arrive without an appointment. One minute the carpet is behaving itself, the next it is wearing a fresh mark, smell, dent, or mystery patch like an unwanted badge. The good news is that most carpet problems can be improved, and many can be solved completely, with a calm approach, the right tools, and a little patience.
Installation jobs are less about brute force and more about accurate measuring, careful cutting, and tidy sequencing. A carpet can look luxurious or lumpy depending on the planning that happens before it is even rolled out. In the steps below, you will find a plain-English process that helps you avoid wasted material, loose edges, visible joins, and the kind of fitting errors that creak at you for months.
Step-by-step method
Measure the room carefully at the widest and longest points, allowing for alcoves, doorways, and a small cutting margin.
Check the subfloor before fitting. It should be clean, dry, sound, and level. Deal with squeaks, damp, and protruding fixings first.
Install grippers and underlay in the correct order for the space. Good preparation does more for the final feel than most people realise.
Plan the pile direction and joins before cutting. Poor planning can make seams visible or change the way light hits the carpet.
Trim gradually rather than taking too much in one cut. A careful shave beats an accidental haircut every time.
Stretch and secure the carpet properly so it sits flat, tight, and smooth without ripples or loose edges.
Before you start
Check tools, carpet direction, doorway heights, skirting condition, and the state of the subfloor before making the first cut. Many fitting headaches begin earlier than people think. A dry, clean, level base and accurate measurements give the whole job a calmer rhythm and reduce waste.
Mistakes to avoid
Measuring only the visible floor and forgetting recesses, thresholds, or turning points on stairs.
Cutting too aggressively instead of trimming gradually.
Skipping subfloor preparation and hoping the carpet will hide every sin below it.
Underestimating how much a poor stretch or badly planned join affects the finished look.
When to call a professional
Bring in a professional if the carpet is expensive, the affected area is large, the stain or smell has soaked into the underlay, there is repeated pest activity, or DIY attempts have already changed the texture or colour. Professional cleaners, fitters, and pest specialists have access to stronger equipment, better diagnostics, and the kind of experience that saves a lot of second-guessing.
Frequently asked questions
How to Measure carpet for stairs
Yes, in many cases it can be improved or solved completely, especially when you act quickly, use the correct method for the carpet type, and avoid over-wetting or over-scrubbing.
What should I test before treating the full area?
Test the cleaning product or method on a hidden section first. Check for colour loss, texture change, or damage to the backing.
How long should I wait before deciding whether it worked?
Wait until the carpet is fully dry. Many marks look lighter or darker while damp, and some residue only becomes obvious after drying.
Tools that usually help
For most carpet jobs, a small kit goes a long way: white microfibre cloths, paper towels, a spoon or blunt scraper, a vacuum with a clean head, lukewarm water, a plain spray bottle, and a carpet-safe detergent or specialist stain remover suited to the issue. A fan is useful for drying, and in odour cases an enzyme-based product can be more effective than a heavily perfumed cleaner because it targets the residue rather than trying to merely out-sing it.
How to protect the carpet afterwards
Once the area is clean and dry, avoid heavy traffic for a while and vacuum the surrounding space when everything has settled. Use entrance mats, rotate rugs, trim pet claws where appropriate, and deal with spills as soon as possible. Prevention is rarely glamorous, but it is the quiet hero in the cape. Good habits reduce repeat staining, odours, tracking, and wear, which means the carpet looks better and lasts longer.
Final thoughts
How to Measure carpet for stairs does not need panic, only a sensible plan. Start gently, work in stages, keep moisture under control, and dry the area properly before judging the result. If the issue is stubborn, widespread, or tied to the subfloor, underlay, or an active pest problem, professional help is often the fastest route to a genuinely clean and lasting finish.
A final practical tip: keep white cloths, paper towels, a blunt scraper, and a small spray bottle ready in a cupboard. Most carpet emergencies are easier to handle when you do not spend the first ten minutes rummaging for supplies while the stain settles in like an unwanted tenant.
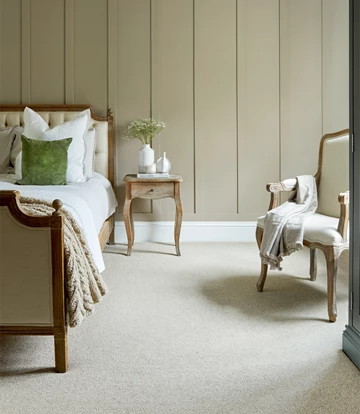
Finding reliable local carpet fitters in East Sussex doesn’t have to be a daunting task. When you’re looking to transform your home or business with quality carpeting, choosing the right professionals makes all the difference. The Fitted Carpet Company has been serving East Sussex and Kent residents with exceptional carpet fitting services, combining expertise, quality materials, and outstanding customer service to deliver results that exceed expectations.
Located strategically to serve both private residents and commercial clients across East Sussex, The Fitted Carpet Company understands the unique needs of local properties. From period homes in Brighton and Hove to modern developments in Eastbourne, and from small businesses in Hastings to large commercial spaces in Crawley, professional carpet fitting requires skill, precision, and attention to detail that only comes with years of experience.
Why Choose Professional Carpet Fitters in East Sussex
Professional carpet installation is an investment that pays dividends in comfort, aesthetics, and longevity. When searching for local carpet fitters near me East Sussex, you’re looking for more than just someone to lay carpet – you need skilled craftspeople who understand the intricacies of proper installation.
Expert carpet fitters bring specialized tools, techniques, and knowledge that ensure your carpet is installed correctly the first time. This includes proper subfloor preparation, accurate measuring, precise cutting, and professional stretching techniques that prevent premature wear and buckling. The difference between DIY installation and professional fitting becomes apparent immediately and continues to show over years of use.
The Fitted Carpet Company’s team of experienced fitters understands East Sussex properties intimately. They know how to work with the varied floor types found in the region, from Victorian floorboards to modern concrete subfloors, ensuring optimal results regardless of your property’s age or construction type.
Precise measurement and cutting to minimize waste
Professional stretching techniques for longevity
Proper subfloor preparation and treatment
Expert seaming for larger areas
Professional finishing and cleanup
Comprehensive Carpet Services Across East Sussex
The Fitted Carpet Company offers comprehensive carpet services throughout East Sussex, catering to both residential and commercial clients. Their service area encompasses major towns and cities including Brighton, Eastbourne, Hastings, Lewes, Seaford, Newhaven, and Uckfield, as well as surrounding villages and rural areas.
For private residents, services include living room carpets, bedroom installations, staircase carpeting, and whole-house projects. Understanding that your home is your sanctuary, the team works efficiently and cleanly, respecting your space while delivering exceptional results. They offer flexible scheduling to accommodate busy lifestyles and can work around furniture where possible.
Commercial carpet clients benefit from specialized expertise in high-traffic installations, including offices, retail spaces, hotels, restaurants, and healthcare facilities. The company understands commercial requirements for durability, fire safety compliance, and minimal disruption during installation. They can work outside regular business hours to ensure operations continue smoothly.
“Quality carpets supplied and fitted across Kent & Sussex. At The Fitted Carpet Company, we’re known for great service, expert installation, and carpets that turn houses into homes.”
Quality Carpet Selection and Supply
Beyond expert fitting, The Fitted Carpet Company supplies quality carpets from leading manufacturers, ensuring you have access to the latest styles, colors, and technologies. Their extensive range includes everything from luxury wool carpets to practical synthetic options, catering to every budget and requirement.
The selection process begins with understanding your specific needs. Factors such as room usage, foot traffic levels, lifestyle considerations, and aesthetic preferences all influence carpet choice. For families with young children or pets, stain-resistant options might be prioritized, while luxury bedrooms might call for sumptuous wool carpets.
Carpet technology has advanced significantly, with options now available that offer enhanced durability, stain resistance, and even antimicrobial properties. The team stays current with these developments, ensuring clients benefit from the latest innovations in carpet manufacturing.
Luxury wool carpets for premium comfort and appearance
Twist pile carpets ideal for high-traffic areas
Saxony carpets for formal living spaces
Loop pile carpets for durability and easy maintenance
Berber carpets combining style with practicality
Commercial-grade carpets for business applications
The Professional Installation Process
Understanding the professional carpet installation process helps homeowners and business owners know what to expect when working with The Fitted Carpet Company. The process begins with an initial consultation and accurate measurement, followed by carpet selection and scheduling.
On installation day, the team arrives with all necessary tools and equipment. They begin by preparing the subfloor, checking for any issues that might affect installation quality. This might include securing loose floorboards, addressing squeaks, or applying appropriate treatments.
The carpet is then carefully positioned, cut to fit precisely, and professionally stretched using specialized equipment. This stretching process is crucial for preventing premature wear and maintaining the carpet’s appearance over time. Proper stretching also helps prevent wrinkles, bubbles, and premature edge wear.
Seaming, where necessary, is performed using professional techniques and equipment to ensure joins are virtually invisible and durable. The installation concludes with thorough cleanup, leaving your space ready to enjoy immediately.
Interestingly, maintaining an active lifestyle can complement the comfort that quality carpeting provides. Just as proper flooring supports daily activities, regular physical activity supports overall well-being. The NHS provides comprehensive guidance on exercise that emphasizes how comfortable home environments can encourage healthy living habits.
Maintenance and Aftercare Support
Professional carpet fitters don’t just install and leave. The Fitted Carpet Company provides comprehensive aftercare support, including maintenance advice and addressing any concerns that may arise. This ongoing relationship ensures your investment continues to provide value for years to come.
Proper carpet care extends far beyond regular vacuuming. Professional advice covers appropriate cleaning products, spot treatment techniques, and when to schedule professional cleaning. Understanding these factors helps maintain your carpet’s appearance and extends its lifespan significantly.
The company also offers guidance on furniture placement, using protective pads, and managing high-traffic areas. These simple steps can prevent premature wear and maintain your carpet’s appearance between professional cleanings.
Emergency support is available for unexpected issues such as water damage or significant staining. Quick response in these situations can often save carpets that might otherwise require complete replacement.
Choosing The Fitted Carpet Company for East Sussex
When searching for local carpet fitters near me East Sussex, several factors distinguish The Fitted Carpet Company from competitors. Their combination of local knowledge, quality products, expert installation, and ongoing support creates exceptional value for both residential and commercial clients.
The company’s reputation is built on consistently exceeding customer expectations. This begins with transparent pricing and honest advice during the selection process, continues through professional installation, and extends to ongoing support and aftercare.
Their team’s expertise covers all aspects of carpet installation, from traditional techniques used in period properties to modern methods suitable for contemporary buildings. This versatility ensures optimal results regardless of your property type or specific requirements.
Just as regular physical activity contributes to overall health and well-being, as outlined in CDC physical activity guidance, quality flooring contributes to a comfortable, healthy living environment. Professional carpet installation supports this by creating spaces that encourage relaxation and comfort.
Conclusion
Finding exceptional local carpet fitters in East Sussex means choosing professionals who combine expertise, quality products, and outstanding service. The Fitted Carpet Company delivers all three, serving private residents and commercial clients with the same commitment to excellence.
Their comprehensive approach covers everything from initial consultation through ongoing aftercare, ensuring your carpet investment provides maximum value and satisfaction. With extensive experience across East Sussex properties and access to quality carpets from leading manufacturers, they’re equipped to handle projects of any size or complexity.
The combination of local knowledge, professional expertise, and commitment to customer satisfaction makes The Fitted Carpet Company the ideal choice for anyone seeking quality carpet fitting services in East Sussex. Their reputation for transforming houses into homes through expert installation and quality carpets continues to grow, supported by satisfied customers throughout the region.
For your next carpet project, whether residential or commercial, trust the professionals who understand that great service, expert installation, and quality products create results that exceed expectations. Contact The Fitted Carpet Company to discover how professional carpet fitting can transform your East Sussex property.
How to Lay carpet tiles is one of those household questions that tends to arrive without an appointment. One minute the carpet is behaving itself, the next it is wearing a fresh mark, smell, dent, or mystery patch like an unwanted badge. The good news is that most carpet problems can be improved, and many can be solved completely, with a calm approach, the right tools, and a little patience.
Installation jobs are less about brute force and more about accurate measuring, careful cutting, and tidy sequencing. A carpet can look luxurious or lumpy depending on the planning that happens before it is even rolled out. In the steps below, you will find a plain-English process that helps you avoid wasted material, loose edges, visible joins, and the kind of fitting errors that creak at you for months.
Step-by-step method
Measure the room carefully at the widest and longest points, allowing for alcoves, doorways, and a small cutting margin.
Check the subfloor before fitting. It should be clean, dry, sound, and level. Deal with squeaks, damp, and protruding fixings first.
Install grippers and underlay in the correct order for the space. Good preparation does more for the final feel than most people realise.
Plan the pile direction and joins before cutting. Poor planning can make seams visible or change the way light hits the carpet.
Trim gradually rather than taking too much in one cut. A careful shave beats an accidental haircut every time.
Stretch and secure the carpet properly so it sits flat, tight, and smooth without ripples or loose edges.
Before you start
Check tools, carpet direction, doorway heights, skirting condition, and the state of the subfloor before making the first cut. Many fitting headaches begin earlier than people think. A dry, clean, level base and accurate measurements give the whole job a calmer rhythm and reduce waste.
Mistakes to avoid
Measuring only the visible floor and forgetting recesses, thresholds, or turning points on stairs.
Cutting too aggressively instead of trimming gradually.
Skipping subfloor preparation and hoping the carpet will hide every sin below it.
Underestimating how much a poor stretch or badly planned join affects the finished look.
When to call a professional
Bring in a professional if the carpet is expensive, the affected area is large, the stain or smell has soaked into the underlay, there is repeated pest activity, or DIY attempts have already changed the texture or colour. Professional cleaners, fitters, and pest specialists have access to stronger equipment, better diagnostics, and the kind of experience that saves a lot of second-guessing.
Frequently asked questions
How to Lay carpet tiles
Yes, in many cases it can be improved or solved completely, especially when you act quickly, use the correct method for the carpet type, and avoid over-wetting or over-scrubbing.
What should I test before treating the full area?
Test the cleaning product or method on a hidden section first. Check for colour loss, texture change, or damage to the backing.
How long should I wait before deciding whether it worked?
Wait until the carpet is fully dry. Many marks look lighter or darker while damp, and some residue only becomes obvious after drying.
Tools that usually help
For most carpet jobs, a small kit goes a long way: white microfibre cloths, paper towels, a spoon or blunt scraper, a vacuum with a clean head, lukewarm water, a plain spray bottle, and a carpet-safe detergent or specialist stain remover suited to the issue. A fan is useful for drying, and in odour cases an enzyme-based product can be more effective than a heavily perfumed cleaner because it targets the residue rather than trying to merely out-sing it.
How to protect the carpet afterwards
Once the area is clean and dry, avoid heavy traffic for a while and vacuum the surrounding space when everything has settled. Use entrance mats, rotate rugs, trim pet claws where appropriate, and deal with spills as soon as possible. Prevention is rarely glamorous, but it is the quiet hero in the cape. Good habits reduce repeat staining, odours, tracking, and wear, which means the carpet looks better and lasts longer.
Final thoughts
How to Lay carpet tiles does not need panic, only a sensible plan. Start gently, work in stages, keep moisture under control, and dry the area properly before judging the result. If the issue is stubborn, widespread, or tied to the subfloor, underlay, or an active pest problem, professional help is often the fastest route to a genuinely clean and lasting finish.
A final practical tip: keep white cloths, paper towels, a blunt scraper, and a small spray bottle ready in a cupboard. Most carpet emergencies are easier to handle when you do not spend the first ten minutes rummaging for supplies while the stain settles in like an unwanted tenant.
How to Lay a carpet is one of those household questions that tends to arrive without an appointment. One minute the carpet is behaving itself, the next it is wearing a fresh mark, smell, dent, or mystery patch like an unwanted badge. The good news is that most fitted carpet problems can be improved, and many can be solved completely, with a calm approach, the right tools, and a little patience.
Installation jobs are less about brute force and more about accurate measuring, careful cutting, and tidy sequencing. A carpet can look luxurious or lumpy depending on the planning that happens before it is even rolled out. In the steps below, you will find a plain-English process that helps you avoid wasted material, loose edges, visible joins, and the kind of fitting errors that creak at you for months.
Step-by-step method
Measure the room carefully at the widest and longest points, allowing for alcoves, doorways, and a small cutting margin.
Check the subfloor before fitting. It should be clean, dry, sound, and level. Deal with squeaks, damp, and protruding fixings first.
Install grippers and underlay in the correct order for the space. Good preparation does more for the final feel than most people realise.
Plan the pile direction and joins before cutting. Poor planning can make seams visible or change the way light hits the carpet.
Trim gradually rather than taking too much in one cut. A careful shave beats an accidental haircut every time.
Stretch and secure the carpet properly so it sits flat, tight, and smooth without ripples or loose edges.
Before you start
Check tools, carpet direction, doorway heights, skirting condition, and the state of the subfloor before making the first cut. Many fitting headaches begin earlier than people think. A dry, clean, level base and accurate measurements give the whole job a calmer rhythm and reduce waste.
Mistakes to avoid
Measuring only the visible floor and forgetting recesses, thresholds, or turning points on stairs.
Cutting too aggressively instead of trimming gradually.
Skipping subfloor preparation and hoping the carpet will hide every sin below it.
Underestimating how much a poor stretch or badly planned join affects the finished look.
When to call a professional
Bring in a professional if the carpet is expensive, the affected area is large, the stain or smell has soaked into the underlay, there is repeated pest activity, or DIY attempts have already changed the texture or colour. Professional cleaners, fitters, and pest specialists have access to stronger equipment, better diagnostics, and the kind of experience that saves a lot of second-guessing.
Frequently asked questions
How to Lay a carpet
Yes, in many cases it can be improved or solved completely, especially when you act quickly, use the correct method for the carpet type, and avoid over-wetting or over-scrubbing.
What should I test before treating the full area?
Test the cleaning product or method on a hidden section first. Check for colour loss, texture change, or damage to the backing.
How long should I wait before deciding whether it worked?
Wait until the carpet is fully dry. Many marks look lighter or darker while damp, and some residue only becomes obvious after drying.
Tools that usually help
For most carpet jobs, a small kit goes a long way: white microfibre cloths, paper towels, a spoon or blunt scraper, a vacuum with a clean head, lukewarm water, a plain spray bottle, and a carpet-safe detergent or specialist stain remover suited to the issue. A fan is useful for drying, and in odour cases an enzyme-based product can be more effective than a heavily perfumed cleaner because it targets the residue rather than trying to merely out-sing it.
How to protect the carpet afterwards
Once the area is clean and dry, avoid heavy traffic for a while and vacuum the surrounding space when everything has settled. Use entrance mats, rotate rugs, trim pet claws where appropriate, and deal with spills as soon as possible. Prevention is rarely glamorous, but it is the quiet hero in the cape. Good habits reduce repeat staining, odours, tracking, and wear, which means the carpet looks better and lasts longer.
Final thoughts
How to Lay a carpet does not need panic, only a sensible plan. Start gently, work in stages, keep moisture under control, and dry the area properly before judging the result. If the issue is stubborn, widespread, or tied to the subfloor, underlay, or an active pest problem, professional help is often the fastest route to a genuinely clean and lasting finish.
A final practical tip: keep white cloths, paper towels, a blunt scraper, and a small spray bottle ready in a cupboard. Most carpet emergencies are easier to handle when you do not spend the first ten minutes rummaging for supplies while the stain settles in like an unwanted tenant.